Q1® Tapes ultimate guide about the industry trend and new techniques to increase profitability when painting a car in a professional bodyshop.
Automotive painting products and processes are constantly evolving and, over time, new masking techniques pop up as new ways to improve performance and quality. One of the key benefits of being up-to-date on industry trends and using new techniques is that these can have a profound influence on a shop’s profitability. To gain the best results when masking and painting a car, there are a few steps to follow.
Don’t underestimate the value of cleaning. It’s essential to remove dust, smog, dirt and organic residues, in order to guarantee the perfect adhesion of both paint and masking products. In case the surfaces are not perfectly clean, masking tape may break off in the middle of the work and the paint itself may flake off during or after the job. So, take some time to thoroughly clean the vehicle’s body:
Tip: Remember to repeat the cleaning procedure after each step of the painting, between one product’s application and the following. Every grain of dust falling on the surface could get trapped in the layer of paint, creating an unpleasant effect once the job is finished. At that point, removing the grains takes long time, attention and patience, and any mistake could spoil the entire job. Prevention is always better.
Hot water and cleanser may not be enough to ensure an accurate cleaning: so, water or solvent base degreasing products are used to remove grease, oil and silicone from the car. You won’t find a universal product for every type of car, so you’ll have to choose the most suitable one for the contaminant that you are trying to degrease. Always remember to protect yourself with gloves, a mask and protective glasses.
Sanding is performed to create adhesion, remove the previous finish and reshape the surfaces. Use thicker grits on the damaged area and get gradually lighter as you go farther from the damage.
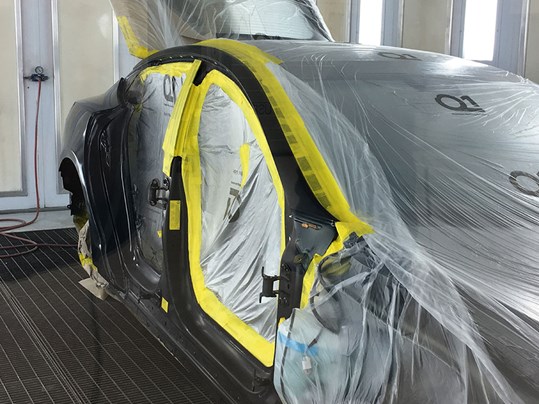
Here we start with the masking process. If you don’t make any mistakes, the masking you provide in this step will last throughout the painting job, and you’ll save time and money by using the products just once. Remember to give the most thorough protection to plastic surfaces, as this material is the most vulnerable to abrasives.
Tip: You can use masking tape both as a protection and as a guide to more easily follow the curves of the vehicle when sanding. Especially if you are not very familiar with sanding, you can swiften the job by applying the tape around curved and irregular edges, even if they don’t need masking, to create a track to follow with the sanding machine. Then, just remove the tape and conclude the procedure.
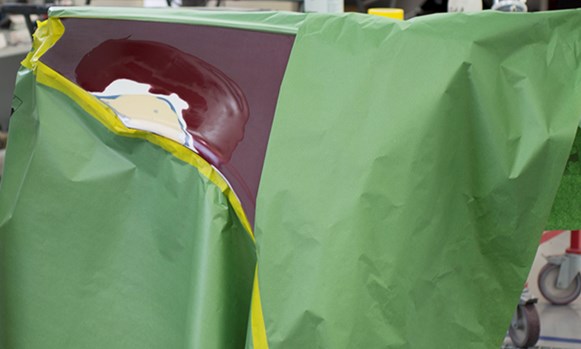
Tip: Have you ever tried reverse masking? In some circumstances, using masking tape and paper in the regular way could create lines way too sharp on areas that, instead, need more uniform painting. In that case, apply masking paper as if you were to mask the damaged area, and then fold it on itself towards the surface to be protected. In this way, the fold of the paper allows the paint overspray to drop less sharp near the line of the tape. See the pictures below for an example of how this is done.
Tip: when you apply masking film or paper on vertical surfaces, remember that over time their weight will increase as they retain the primers and paints you use. As a result, they might get off the surface during the painting job. You can prevent this problem by fasten them with a wider-size masking tape.
Automotive fillers are used to level scratches and scrapings. To ease their application, you can use the same technique we have seen in the sanding step, using masking tape as a guide to better follow curves and bends. Once finished, let them dry before proceeding with the job: drying times depend on the filler you use, but in any case, you shouldn’t exceed 65°C (149°F) for 5 minutes*.
After the application of the filler, you have to perform the sanding process again to flatten the treated area and get a uniform surface.
Tip: Use a red or orange control powder to spot uneven areas during sanding process. When every trace of the dust has disappeared, it means the sanding process is complete.
The application of the primer is aimed at providing a good adhesion to the following layers and protect the surface from rust and corrosion. You can use two types of products: one-component or two-component primers, each of them with pros and cons: for example, one-component primers are ready to use without mixing, but they need heat to reach full cure.
After application, the primer dries at 90°C (194°F) for 15-20 minutes* or with IR lamp at 110°C (230°F) for 1,5-2 minutes*.
Once the primer is dry, the undercoat is applied to cover up all small imperfections. After application, let the undercoat dry exposing the surface at IR lamp at 70°C (158°F) for 15 minutes*.
Now you have to sand again, one last time, to level the undercoat and peel away the excess product. You should sand with a medium grit (600), using again a control powder to check whether the sanding has been effective or not.
We can finally paint the car with the required combination of basecoat and clearcoat. Most of the cars on the market require just one type of basecoat and one type of clearcoat, but in some cases – such as vehicles with pearlescent effects – we need two basecoats and one clearcoat. Only in very few cases, you might need two basecoats and two clearcoats.
Both the basecoat and the clearcoat dry in spray booth at 60°C (140°F) for 30 minutes*, or with IR lamp at 80°C (175°F) for 15-20 minutes*. In case you are using two basecoats, the first one dries at 40-50°C (104-122°F) for 15 minutes*.
Tip: remove the masking products just after the drying cycle, as many tapes leave adhesive residue and break when exposed to sudden temperature inversions. As an alternative, you can choose a masking tape that resists high temperatures, such as Q1® Premium Masking Tape.
At this point you are done. If you followed the procedure carefully and took care in every step, the car is in front of you shining in its brand new coating, and you have learned some tricks to save time, reduce product waste and increase quality. Congratulations!
*Drying times and temperatures may vary according to the product you use. All values reported are determined by Q1® Tapes during workshops with body shops and professional paints producers. Always read the technical data sheet of the products you use.
Let's get in touch.
Keeping excellent masking products in your shop means selling efficiency and high productivity to your customers. Join the Q1® family to watch your business grow.